
Crispy Chicken Caesar Sandwich is my go‑to for a satisfying lunch that feels both indulgent and quick. I love how the chicken breast becomes golden and crunchy while staying juicy inside, and the classic Caesar dressing adds a creamy, garlicky punch that pairs perfectly with crisp romaine lettuce. Served on toasted crusty bread, each bite delivers a balance of texture and flavor that keeps you reaching for more. In this guide I’ll walk you through every step, from seasoning the chicken to assembling the sandwich, so you can recreate this restaurant‑style favorite right at home without fuss!!!.
Table of Contents
Why You’ll Love This Crispy Chicken Caesar Sandwich
There is something universally comforting about a sandwich that combines a protein with fresh greens and a tangy sauce. This particular version delivers that comfort while also giving you a satisfying crunch from the breadcrumb coating. The contrast between the warm, golden chicken and the cool, crisp lettuce creates a multi‑dimensional mouthfeel that keeps the eating experience interesting from the first bite to the last.
Beyond texture, the flavor profile is familiar yet elevated. The Caesar dressing contributes a subtle umami depth from the Parmesan and anchovy notes, while the garlic powder in the breadcrumb mix adds a gentle aromatic lift. All of these components come together on a sturdy slice of crusty bread that holds everything in place without getting soggy, making it an ideal handheld meal for busy weekdays or relaxed weekends.
Equipment You’ll Need
- Oven or toaster oven for finishing the chicken
- Large skillet or frying pan for pan‑frying
- Mixing bowl for breadcrumb coating
- Measuring cups and spoons
- Wire rack or baking sheet
- Sharp knife for slicing bread and chopping lettuce
Having the right tools streamlines the process and helps you achieve consistent results. A skillet that distributes heat evenly ensures the chicken browns uniformly, while a wire rack keeps the cooked chicken from sitting in its own juices, preserving that coveted crispness. A good mixing bowl makes it easy to combine the dry ingredients without creating a mess, and a reliable oven ensures the interior of the chicken reaches a safe temperature without over‑cooking the exterior.
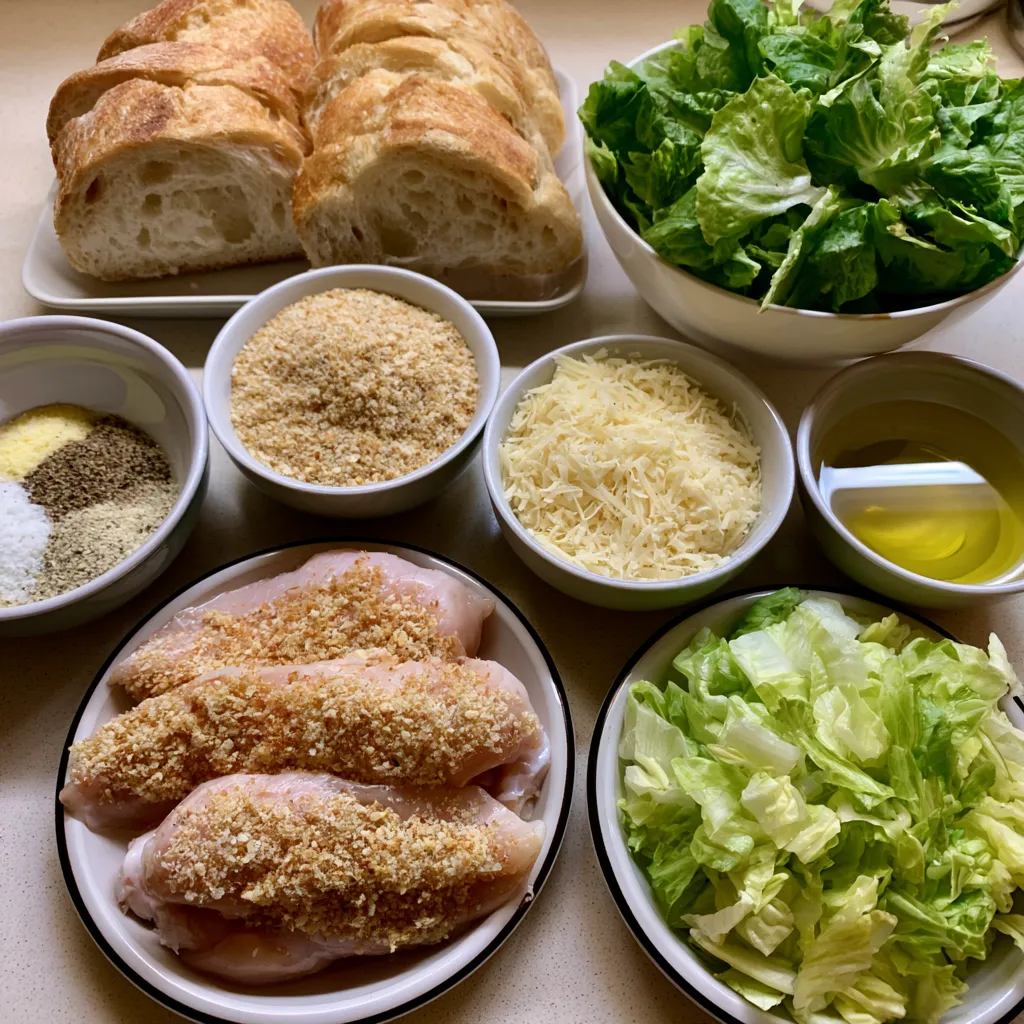
Ingredients for Crispy Chicken Caesar Sandwich
- 2 boneless, skinless chicken breasts
- 1 cup breadcrumbs
- 1/2 cup grated Parmesan cheese
- 1 teaspoon garlic powder
- Salt and pepper to taste
- 2 tablespoons vegetable oil
- 4 slices crusty bread
- 1 cup romaine lettuce, chopped
- 1/2 cup Caesar dressing
Ingredient Substitutions
- If you lack breadcrumbs, you can pulse stale bread in a food processor for a homemade version.
- For a lower‑fat option, use a light Caesar dressing or make a yogurt‑based version.
- Gluten‑free breadcrumbs work well for those avoiding wheat.
How to Make Crispy Chicken Caesar Sandwich (Step‑by‑Step)
Step 1: Preheat the Oven
Set your oven to 375°F (190°C) and let it fully preheat while you prepare the chicken. A properly heated oven ensures the chicken finishes cooking evenly after the initial pan‑fry, giving you a juicy interior and a crisp exterior.
Step 2: Prepare the Breadcrumb Mixture
In a medium bowl, combine the breadcrumbs, grated Parmesan, garlic powder, a pinch of salt, and freshly ground black pepper. Mix until the ingredients are evenly distributed; the cheese will add flavor and help the coating adhere.
Step 3: Coat the Chicken
Pat the chicken breasts dry with paper towels. Press each breast into the breadcrumb mixture, ensuring each side is fully covered. The coating should stick firmly—if it seems loose, let the chicken rest for a minute before moving to the pan.

Step 4: Pan‑Fry the Chicken
Heat the vegetable oil in a large skillet over medium heat. When the oil shimmers, add the coated chicken breasts. Cook for 3‑4 minutes per side, watching for a deep golden color. This step creates the signature crunch that defines the sandwich.
Step 5: Finish in the Oven
Transfer the browned chicken to a wire rack set over a baking sheet. Place it in the preheated oven and bake for 15‑20 minutes, or until the internal temperature reaches 165°F (74°C). The oven finish guarantees the meat is cooked through without losing its crisp exterior.
Step 6: Toast the Bread
While the chicken rests, slice the crusty bread if needed and toast it until lightly golden. A toasted surface adds another layer of texture and prevents the bread from becoming soggy once the dressing is added.
Step 7: Assemble the Sandwich
Lay a generous handful of chopped romaine lettuce on the bottom slice of bread, place the hot chicken on top, and drizzle with Caesar dressing. Crown with the second slice of toasted bread, press gently, and serve immediately while the chicken is still warm and the bread is crisp.
Variations and Twists
If you enjoy a little heat, sprinkle a pinch of red‑pepper flakes onto the breadcrumb mixture before coating the chicken. For a smoky flavor, swap the regular breadcrumbs for smoked‑flavored breadcrumbs or add a dash of smoked paprika to the mix. Those who prefer a lighter sandwich can replace the crusty bread with a whole‑grain wrap, though the traditional sandwich texture will change slightly.
Another popular twist is to add sliced avocado for creaminess or a few sun‑dried tomato pieces for an extra burst of umami. You can also experiment with different greens—baby spinach or arugula work well if you want a peppery bite. Each variation keeps the core concept intact while allowing you to tailor the sandwich to your personal palate.
What to Serve With Crispy Chicken Caesar Sandwich
A crisp side salad dressed with a simple vinaigrette complements the richness of the sandwich without competing for attention. You might also consider a small bowl of tomato basil soup, which adds warmth and a comforting contrast to the crunchy sandwich.
For a more indulgent experience, serve with seasoned sweet potato fries or a handful of kettle‑cooked potato chips. A refreshing glass of iced tea or a sparkling water with a splash of lemon balances the savory flavors and keeps the meal feeling light.
Pro Tips for Perfect Results
- Pat the chicken dry before coating; excess moisture prevents the breadcrumb mixture from sticking.
- Use a light hand when pressing the coating—too much pressure can crush the breadcrumbs and reduce crunch.
- Let the chicken rest for a few minutes after baking; this helps the juices redistribute and keeps the meat moist.
- Toast the bread just before assembling to maintain a firm crunch against the creamy dressing.
- When applying Caesar dressing, use a spoon rather than a squeeze bottle for even coverage and to avoid soggy bread.

Common Mistakes to Avoid
- Skipping the oven finish can leave the chicken undercooked inside while the exterior looks done.
- Overcrowding the skillet leads to steaming rather than browning, reducing the desired crunch.
- Using overly thick bread slices may cause the sandwich to become unwieldy and difficult to eat.
- Applying too much dressing makes the sandwich soggy; a light drizzle is sufficient.
- Neglecting to season the breadcrumb mixture results in a bland coating.
Storage, Reheating & Make‑Ahead Tips
If you need to prepare the sandwich ahead of time, store the cooked chicken and toasted bread separately in airtight containers. The chicken can be refrigerated for up to three days and reheated in a 350°F oven for 10 minutes to restore its crispness. Lettuce should be kept dry and added just before serving to maintain crunch.
For meal‑prep enthusiasts, assemble the sandwich without the dressing and wrap tightly in parchment paper before refrigerating. When ready to eat, spread the Caesar dressing, add the lettuce, and enjoy. This method preserves texture and flavor while allowing you to enjoy a gourmet‑style lunch at work or school.
Frequently Asked Questions
Can I use a different type of bread? Absolutely. A sturdy sourdough or ciabatta works well, but the key is to choose a bread that can hold the fillings without falling apart.
Is it necessary to bake the chicken after pan‑frying? Baking ensures the interior reaches a safe temperature while preserving the exterior crunch. Skipping this step may result in a partially cooked center.
How do I make a homemade Caesar dressing? Blend together mayonnaise, lemon juice, Dijon mustard, grated Parmesan, minced garlic, and a splash of anchovy paste. Adjust salt and pepper to taste.
Can I freeze the cooked chicken? Yes. Cool the chicken completely, slice, and freeze in a single layer on a tray. Transfer to a freezer bag once solid; reheat in the oven to retain crispness.
What if I don’t have Parmesan cheese? A sharp cheddar or Pecorino Romano can substitute, though the flavor profile will shift slightly.

Additional Tips
For those watching carbs, you can swap the crusty bread for a low‑carb lettuce wrap, keeping the sandwich handheld while cutting calories. If you prefer a spicier bite, mix a teaspoon of chipotle powder into the breadcrumb coating or drizzle a few drops of hot sauce onto the Caesar dressing before assembling. These small adjustments let you personalize the sandwich without compromising its signature crunch and flavor.
Conclusion
With a few simple steps and everyday ingredients, you can create a Crispy Chicken Caesar Sandwich that rivals deli‑counter offerings. The combination of crunchy coating, savory dressing, and fresh lettuce makes each bite unforgettable. Follow the guide, experiment with suggested twists, and enjoy a satisfying, restaurant‑quality sandwich right at home.
Print
Crispy Chicken Caesar Sandwich offers crunchy flavor and classic taste
- Total Time: 45 minutes
- Yield: 2 servings 1x
- Diet: Omnivore
Description
Crispy Chicken Caesar Sandwich combines a golden breadcrumb‑coated chicken breast with creamy Caesar dressing, crisp romaine lettuce, and toasted crusty bread for a handheld classic. This easy, quick‑prep recipe yields a satisfying sandwich that balances crunchy texture with savory flavor, making it perfect for lunch or dinner. Follow simple steps to bake the chicken, toast the bread, and assemble a restaurant‑style favorite in under one hour. Enjoy it with a crisp apple or a light soup today!!.
Ingredients
- 2 boneless, skinless chicken breasts
- 1 cup breadcrumbs
- 1/2 cup grated Parmesan cheese
- 1 teaspoon garlic powder
- Salt and pepper to taste
- 2 tablespoons vegetable oil
- 4 slices crusty bread
- 1 cup romaine lettuce, chopped
- 1/2 cup Caesar dressing
Instructions
- Preheat oven to 375°F (190°C).
- Mix breadcrumbs, Parmesan, garlic powder, salt, and pepper.
- Coat chicken breasts in mixture.
- Pan‑fry in oil 3‑4 minutes per side until golden.
- Transfer to baking sheet and bake 15‑20 minutes until cooked through.
- Toast bread slices.
- Assemble sandwich with lettuce, chicken, and Caesar dressing between toasted bread.
Notes
- For extra crunch
- let the coated chicken rest 5 minutes before frying. Use a light hand when pressing the coating to avoid crushing crumbs. Serve immediately for best texture.
- Prep Time: 15 minutes
- Cook Time: 30 minutes
- Category: Chicken Breast
- Method: Baking, Pan-frying
- Cuisine: American
Nutrition
- Serving Size: 2 servings
- Calories: 620
- Sugar: 2 g
- Sodium: 800 mg
- Fat: 25 g
- Saturated Fat: 7 g
- Unsaturated Fat: 12 g
- Trans Fat: 0 g
- Carbohydrates: 45 g
- Fiber: 2 g
- Protein: 45 g
- Cholesterol: 130 mg
Keywords: Crispy Chicken Caesar Sandwich, easy chicken sandwich, chicken caesar recipe, quick lunch ideas, how to make chicken sandwich, best chicken sandwich recipe, crispy chicken dinner